

From Craft Room to THE HIVE
- threebeedesign
- Mar 21, 2021
- 5 min read

A place where THREE BEE DESIGN gets stuff done

I recently set out for a redesign of my craft room, I had rightfully dubbed "The Crap Room".
I had been dreaming about redoing this space for over 3 years, after the pandemic hit I was prompted to finally get started. I am sure that many of you can relate.
I was working out of a room made up of folding tables and hand me down pieces already owned. It worked ok but was crowded and busy with unnecessary clutter, witch made it hard to be creative as I wanted to be.
I began first by outlining my needs for the space. I often do this by creating a bubble plan, this can really help you to focus and ensure that all your needs for the space are being met.

Needs for space:
•Sewing desk
•Storage for sewing equipment
•Computer desk
•Storage for office equipment
•Printer space
•Tall cutting table
•Extra table for working on… would like it to have wheels
•Open area for working in
•Comfortable relaxing space
•TV space good for viewing from all work stations
•Storage for personal things
•Garbage receptacles
•Adequate lighting for each work space

Next I researched items that I could use to accomplish my worktop and storage needs. I decided that IKEA was the perfect place to purchase most items needed. They met the need for usability and value.
Putting the selected pieces into a scaled space plan ensures they will fit nicely while still meeting all the needs for the space. Using an online space planning program makes moving things around simpler (I use Bassett's Furniture Room Planner).
It is important not to miss this step! Ensuring you can fit all purchased items into the space saves time and money.

Using measurements of the items I selected at IKEA, I was able to meet all of the needs outlined in my bubble plan diagram.
I decided to go a bit further and create a 3D rendering of the space, helping me to visualize how it would look. (I use Home Design Software Homestyler).

These renderings were created months before I began the remodel and were done using a wall color I ultimately changed.


With my plans stalled because of the Pandemic shutdown. I began to rethink the design and furniture pieces so I created a second space plan using updated pieces.
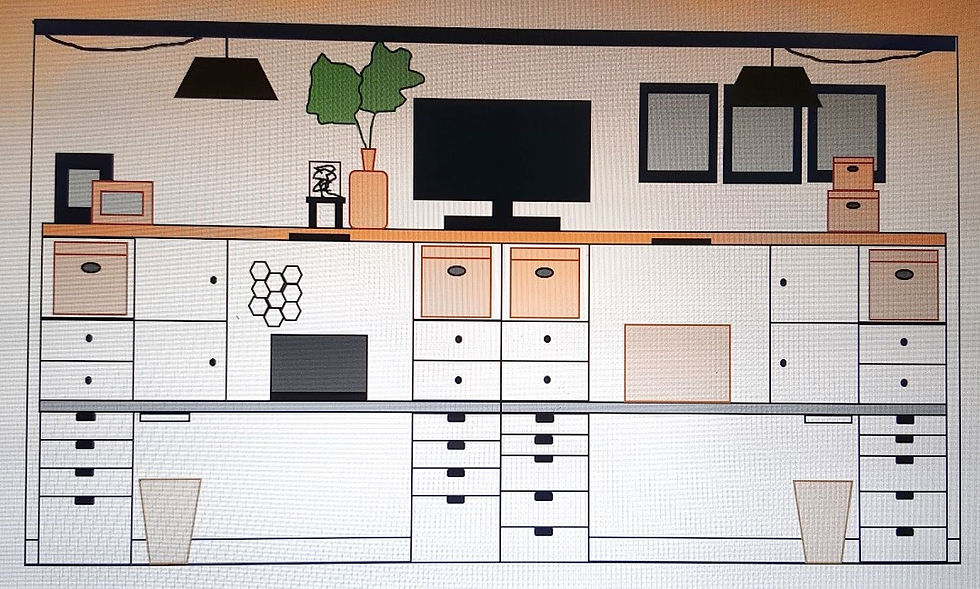
Using a different method for visualization, I created an elevation drawing including the new pieces and how I envisioned them.
One night I woke with an interesting idea for the ceiling, I always keep a small notebook and pen next to my bed for this reason. I jotted the idea down and the next day I created a scaled drawing of the ceiling along with a dimensioned plan for my talented husband to work from.


The shutdown gave me a chance to clear out the room and repaint. My husband and I took one weekend to install the ceiling and flat molding surround. I was so excited at how it turned out! I decided there and then to redub my space "THE HIVE”.

Once the stores opened I was off. With the help of a good friend and her truck we set out to purchase all the items on my plan. It took three full days to assemble everything. Thank goodness I have patience and enjoy doing this sort of thing.

My wonderful husband also cut two wood shelfs fitting above the purchased IKEA pieces. Once everything was in place it was time to organize the storage pieces, personalize and finish the room.
Now its time to take a look at the before and after photos... Please don't judge and keep in mind that the original design was done almost 10 years ago.

BEFORE
The black and white fabric was used to conceal wire shelving units containing my crafting supplies. The table in the center of the room was the only work surface, making for a cumbersome transition between projects. Lighting was also a problem given I only had one source overhead.
WHAT A DIFFERENCE, RIGHT?

AFTER
This wall was transformed to include two dedicated work spaces, with all necessary items neatly organized behind closed doors and drawers.
The sewing work space includes a comfortable chair and light source just above the work area. I used a cardboard box open at the back and covered in brown craft paper to disguise my sewing machine when not in use. Added rope handles adorned with large wood beads add a fun touch.

The computer work space includes another comfortable chair and light source above the work area. These lights were also purchased at IKEA and by adding a remote activated plug I am able to operate them without accessing the cord switch. Hiding those cords adds to the overall look. I also took care to include trash receptacles in each workspace making them more functional.


BEFORE
I love this little upcycled desk but it never functioned well in this room, so it has been moved to my bedroom and is now used as a wonderful vanity.

AFTER
Now this space is functional and creates the perfect place for my printer, again concealed by a fun covered box. This trick helps to eliminate visual clutter.
I have since added magazine holders filled with paint samples and books to the bottom shelf.

BEFORE
I absolutely loved this recliner I splurged on several years ago. It was functional for relaxing but the outdated fabric needed to change for the new space. It found a new home with my daughters family and is now used for bedtime stories with my Harper Lily.

AFTER
This space has been transformed to a clean and comfortable space with a timeless hound's-tooth fabric chair and ottoman. I was able to salvage my existing lamp by spraying the base with matte black paint. The cute side table was purchased at Hobby Lobby.

BEFORE
This space was used as computer workspace. It was adequate but the temporary folding furniture was only a place holder until I could afford something more functional.
The only light for this space was small and did not suffice for my needs.

AFTER
The changes of this space enabled me to include a tall cutting table and second rolling table, doubling my work surface.
The rolling table is my favorite addition to "THE HIVE". Its mobility enables me to double the work surface for each workspace in the room. I am sure that you caught another covered box atop the table, it conceals my Cricut Maker. the smart wall storage houses some of the supplies needed for creating.
Lighting in this area was much improved by adding a pendant above, equipped again with a remote enabled plug.
I love working in my new creative space and look forward to going to work in it every day. I hope that you have enjoyed walking through this transformation with me from the "Crap Room" to "THE HIVE" where THREE BEE DESIGN gets stuff done.


I love this this thoughtful and beautiful transformation! Thank you for sharing your process. So maybe having a carefully planned and organized space allows one to be more creative?